 Skip to content
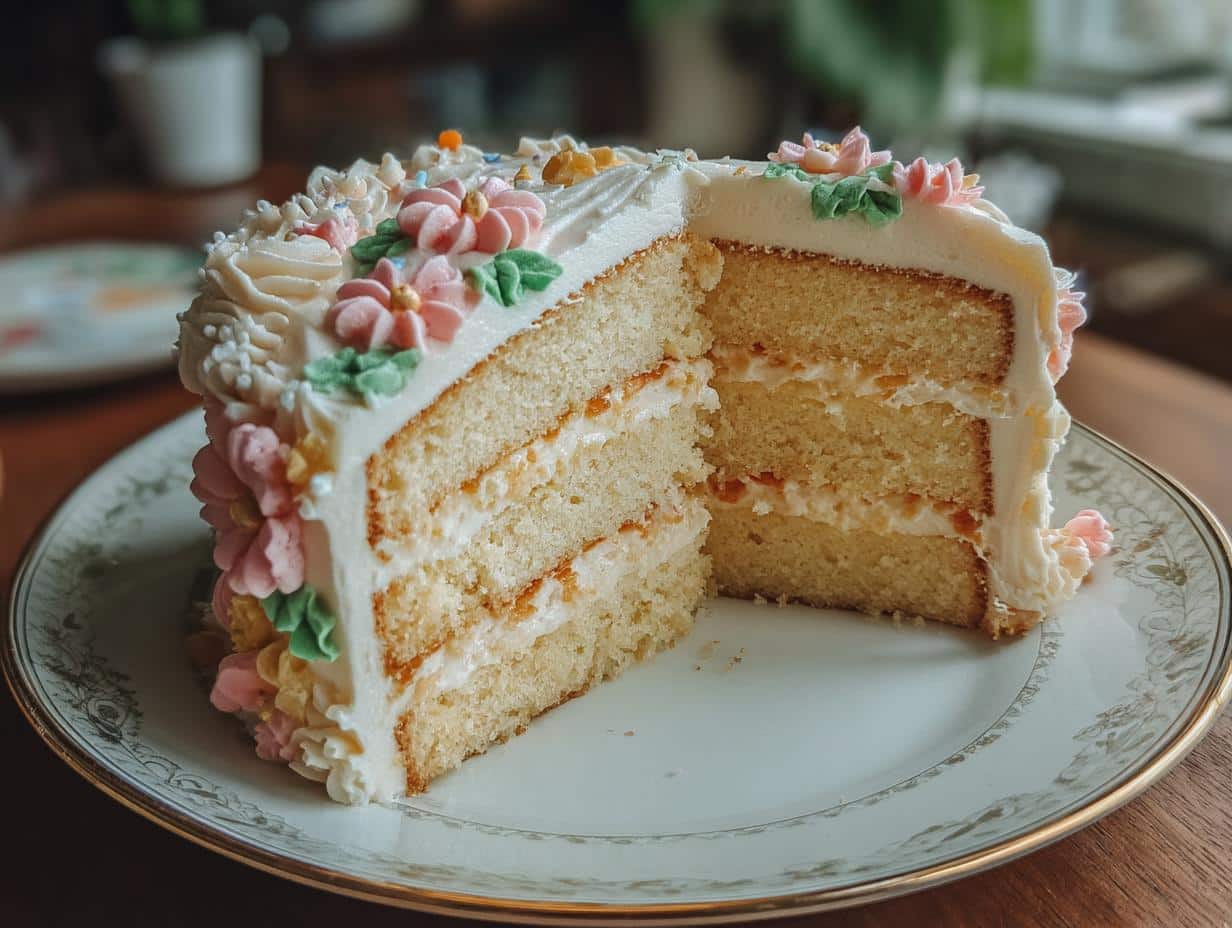
Oh, I just adore diving into a good old-fashioned bake, and when it comes to celebrations, nothing beats the sheer charm of vintage birthday cakes. There’s something so incredibly special about a cake that feels like it’s stepped right out of a cherished memory, isn’t there? It’s not just about the sugar and flour; it’s about that gorgeous, nostalgic aesthetic – think delicate piping, soft pastels, and maybe even a cascade of perfectly formed edible flowers. My kitchen practically sighs with happiness when I get to whip up a cake that whispers tales of simpler times and timeless elegance. If you’re dreaming of a celebration that feels truly classic and utterly beautiful, you’ve come to the right place!
Essential Elements for Your Vintage Birthday Cakes
Alright, so you want to bake a cake that feels like a warm hug from the past? You’ve got to start with the good stuff! For these gorgeous vintage birthday cakes, quality ingredients really make all the difference. Trust me, using the best butter you can find and making sure your eggs are fresh will totally elevate your bake. It’s all about building that beautiful, classic flavor from the ground up. We’re going for that lovely, tender crumb and a frosting that’s just dreamy. Getting these basics right is the secret sauce to any truly spectacular cake, especially one with that timeless retro charm.
Ingredients for a Classic Vintage Birthday Cakes
Okay, let’s get down to what you’ll need for this beauty. For the cake itself, grab yourself 1 cup (that’s two sticks!) of good unsalted butter, make sure it’s nice and soft. Then you’ll need 2 cups of granulated sugar, 4 large eggs (room temperature is best, seriously!), and a teaspoon of pure vanilla extract. For the dry bits, we’re looking at 3 cups of all-purpose flour, 1 teaspoon of baking soda, and half a teaspoon of salt. And for that moistness? You’ll need 1 1/2 cups of buttermilk. Now, for the frosting, which is practically a cake’s best friend: another cup of softened unsalted butter, 4 cups of powdered sugar (sifted is a good idea!), about 1/4 cup of milk, and another teaspoon of vanilla extract. If you’re feeling adventurous, a little food coloring can add that perfect pastel pop! For decorating, have your piping bags ready with your favorite tips for those pretty flowers, maybe some edible pearls, and any cute fondant cutouts you’ve dreamed up. If your piped flowers aren’t pre-made, you’ll want to have your piping gel or buttercream ready to go before you even start frosting the cake.
Tools for Creating Elegant Vintage Cake Decorations
To make these classic birthday cake ideas come to life, you’ll need a few trusty tools. You’ll definitely want two 8-inch round cake pans. A sturdy mixing bowl, a good hand mixer or stand mixer, and a reliable whisk are essential for getting that batter just right. A rubber spatula is a must for scraping down the sides of the bowl. And of course, you’ll need a wire rack for cooling. For decorating, make sure you have your piping bags fitted with tips like a star tip (for roses or swirls) and maybe a small round tip for details. An offset spatula is super handy for spreading that frosting smoothly. If you’re going all out, a cake turntable can make decorating a breeze!
Step-by-Step Guide to Making Vintage Birthday Cakes
Alright, let’s get this party started! Making these beautiful vintage birthday cakes is a process that’s totally doable, and honestly, it’s half the fun. We’ll break it down into a few easy steps, so don’t you worry. The key is to follow along, take your time, and enjoy the process. It really is like a little baking dance, and when you get to the end, you’ll have a showstopper that looks like it belongs in a fancy bakery window from way back when!
Preparing the Cake Batter for Vintage Birthday Cakes
First things first, get that oven preheating to 350°F (175°C) and make sure your two 8-inch round cake pans are greased and floured really well. Now, grab your biggest mixing bowl. We’re going to cream together that softened butter and sugar until it’s light and fluffy – this is super important for a tender cake, so give it a good few minutes! Then, beat in those eggs one by one, making sure each one is mixed in before adding the next, followed by the vanilla. In another bowl, whisk together your flour, baking soda, and salt. Now, here’s the trick: we’ll add the dry stuff and the buttermilk to the butter mixture, alternating between them. Start and end with the dry ingredients. Mix it all up until it’s *just* combined – don’t go crazy overmixing, or your cake might get tough!
Baking and Cooling for the Perfect Vintage Birthday Cakes
Once your batter is ready, divide it evenly between those prepared pans. Pop them into your preheated oven and let them bake for about 30 to 35 minutes. How do you know they’re done? The best way is the skewer test! Stick a wooden skewer or a toothpick right into the center of the cake. If it comes out clean, no wet batter clinging to it, then they’re ready! Let the cakes cool in their pans for about 10 minutes – this helps them firm up a bit. Then, carefully flip them out onto a wire rack to cool completely. Seriously, let them cool *all the way* before you even think about frosting, or you’ll have a melty mess!
Crafting the Frosting and Assembling Your Vintage Birthday Cakes
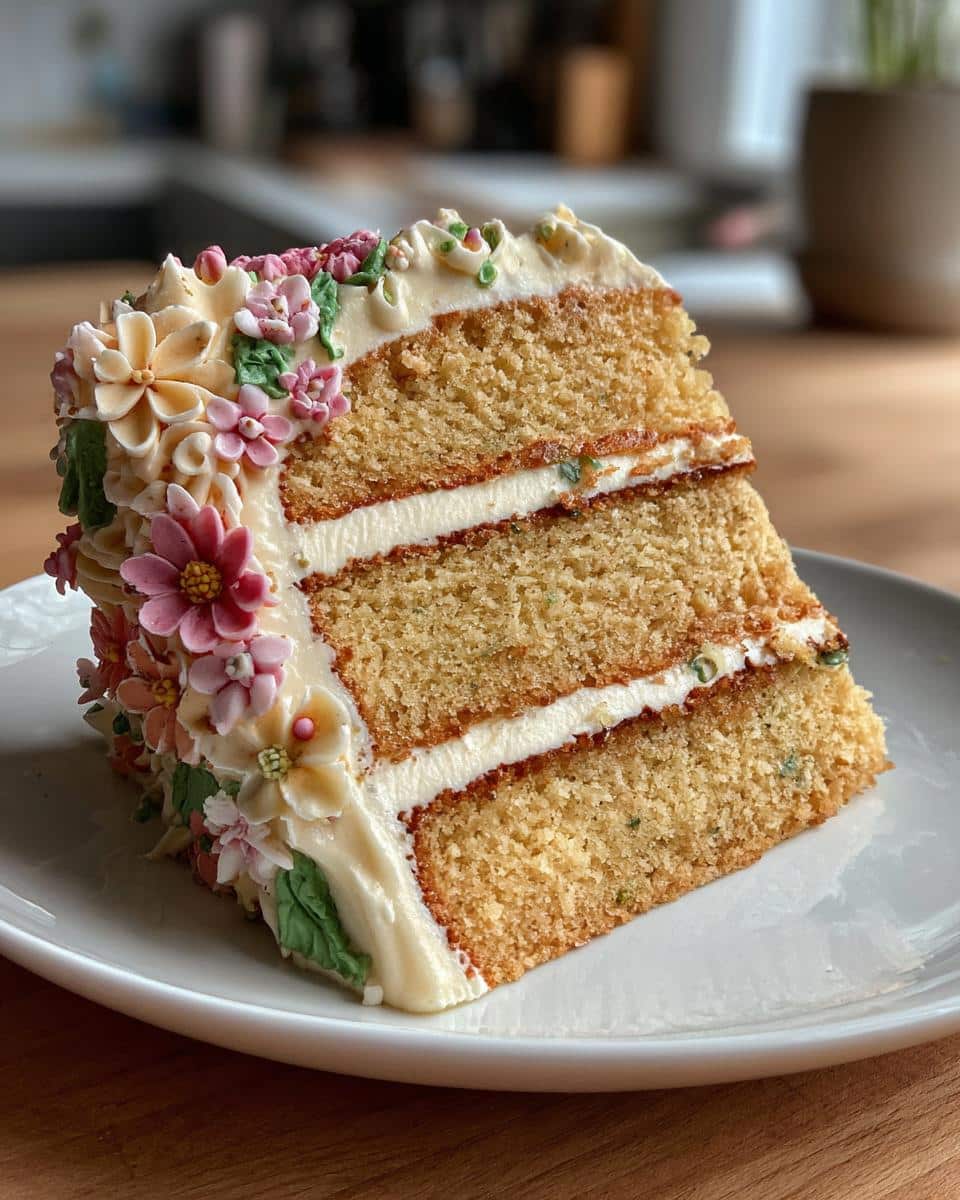
While the cakes are cooling, let’s whip up that dreamy frosting. In a clean bowl, cream together the softened butter and powdered sugar until it’s smooth. Then, add in the milk and vanilla extract and beat it until it’s wonderfully fluffy and spreadable. If you want those lovely pastel colors, now’s the time to add a tiny bit of food coloring and mix it in. Once your cakes are totally cool, place one layer on your serving plate or cake stand. Spread a generous amount of frosting on top, then carefully place the second cake layer on top of that. Now, use your offset spatula to frost the entire cake – top, sides, everywhere! Smooth it out as best you can, or go for a slightly rustic look if that’s more your style. This is where the magic really starts to happen for those retro birthday cakes!
Achieving Authentic Antique Cake Designs with Decorations
Now for the really fun part – making your cake look like a million bucks from yesteryear! When we talk about antique cake designs, it’s all about those charming details. Piped flowers are absolute showstoppers; think delicate roses or pretty little blossoms made with your star tip and some practice. Don’t be afraid to go a little wild with them, maybe even a whole cascade down the side! Edible pearls add such a sweet, classic touch, just sprinkle them around the base or between layers. And fondant cutouts, like little bows or hearts, can really seal the deal. My secret? I like to keep the base frosting pretty smooth, maybe with slight swirls from the spatula, and then let the decorations be the stars of the show. It really makes those elegant vintage cake decorations pop!
Frequently Asked Questions About Vintage Birthday Cakes
Got some questions swirling around about these lovely vintage birthday cakes? I totally get it! Here are a few things folks often ask me:
Q1. Can I use something other than buttermilk?
Absolutely! If you don’t have buttermilk on hand, you can totally make your own substitute. Just take 1 1/2 cups of regular milk and stir in 1 1/2 tablespoons of lemon juice or white vinegar. Let it sit for about 5-10 minutes until it looks a little curdled. It works just like the real thing for these classic birthday cake ideas! For more baking tips, check out this guide on how to make boxed cake mix better.
Q2. How do I store a vintage-style cake?
These cakes are best stored at room temperature, especially if they have buttercream frosting. Keep them in an airtight cake container. They should stay lovely for about 2-3 days. If it’s super warm in your house, you might want to pop it in the fridge, but let it come back to room temp before serving so the frosting doesn’t get too hard.
Q3. How can I make my piped flowers look more realistic?
Practice makes perfect! I recommend practicing on a piece of parchment paper first. Use slightly different shades of the same color for depth, and don’t be afraid to layer petals. For a truly authentic look on your retro birthday cakes, think about soft, muted colors and delicate shapes rather than super bright, bold ones. You can find inspiration for herbs and spices that might inspire color palettes.
Q4. Can I make parts of this cake ahead of time?
You sure can! The cake layers themselves can be baked a day in advance and stored tightly wrapped at room temperature. The frosting can also be made ahead and kept in the fridge; just let it soften a bit and give it a good whip before using it to frost your cake.
Understanding the Nutritional Profile of Your Vintage Birthday Cakes
Just a little heads-up on the yummy details! This classic recipe, when sliced into about 12 servings, typically comes in around 450 calories. You’re looking at roughly 25g of fat (about 15g saturated), 55g of carbs with 50g of sugar, and about 4g of protein per slice. Keep in mind, these numbers are just estimates and can totally change depending on the brands you use and how generous you are with that frosting! For more information on baking ingredients, you might find this article on substituting butter for oil helpful.
Print
Sweet vintage birthday cakes: 4 stunning designs
- Total Time: 1 hour 5 minutes
- Yield: 12 servings 1x
- Diet: Vegetarian
Description
Discover beautiful vintage birthday cakes with classic designs, intricate frosting, and floral decorations. Perfect for a nostalgic and elegant celebration.
Ingredients
- 1 cup (2 sticks) unsalted butter, softened
- 2 cups granulated sugar
- 4 large eggs
- 1 teaspoon vanilla extract
- 3 cups all-purpose flour
- 1 teaspoon baking soda
- 1/2 teaspoon salt
- 1 1/2 cups buttermilk
- For Frosting:
- 1 cup (2 sticks) unsalted butter, softened
- 4 cups powdered sugar
- 1/4 cup milk
- 1 teaspoon vanilla extract
- Food coloring (optional)
- Decorations:
- Piped flowers
- Edible pearls
- Fondant cutouts
Instructions
- Preheat your oven to 350°F (175°C). Grease and flour two 8-inch round cake pans.
- In a large bowl, cream together the softened butter and granulated sugar until light and fluffy.
- Beat in the eggs one at a time, then stir in the vanilla extract.
- In a separate bowl, whisk together the flour, baking soda, and salt.
- Gradually add the dry ingredients to the wet ingredients, alternating with the buttermilk, beginning and ending with the dry ingredients. Mix until just combined.
- Divide the batter evenly between the prepared cake pans.
- Bake for 30-35 minutes, or until a wooden skewer inserted into the center comes out clean.
- Let the cakes cool in the pans for 10 minutes before inverting them onto a wire rack to cool completely.
- To make the frosting, cream together the softened butter and powdered sugar until smooth.
- Add the milk and vanilla extract, and beat until fluffy. Add food coloring if desired.
- Once the cakes are completely cool, frost the top of one layer, then place the second layer on top. Frost the entire cake with the prepared frosting.
- Decorate with piped flowers, edible pearls, or fondant cutouts to achieve a vintage look.
Notes
- Ensure all ingredients are at room temperature for best results.
- Do not overmix the batter.
- Allow cakes to cool completely before frosting to prevent melting.
- Get creative with your vintage-inspired decorations!
- Prep Time: 30 minutes
- Cook Time: 35 minutes
- Category: Dessert
- Method: Baking
- Cuisine: American
Nutrition
- Serving Size: 1 slice
- Calories: 450
- Sugar: 50g
- Sodium: 200mg
- Fat: 25g
- Saturated Fat: 15g
- Unsaturated Fat: 10g
- Trans Fat: 0g
- Carbohydrates: 55g
- Fiber: 1g
- Protein: 4g
- Cholesterol: 80mg
Keywords: vintage birthday cakes, retro birthday cakes, classic birthday cake ideas, antique cake designs, old-fashioned birthday cakes, vintage floral birthday cakes, 1950s style birthday cakes, elegant vintage cake decorations, rustic vintage birthday cakes, pastel birthday cake designs, birthday cakes with piped flowers, nostalgia cake, timeless cake design