 Skip to content
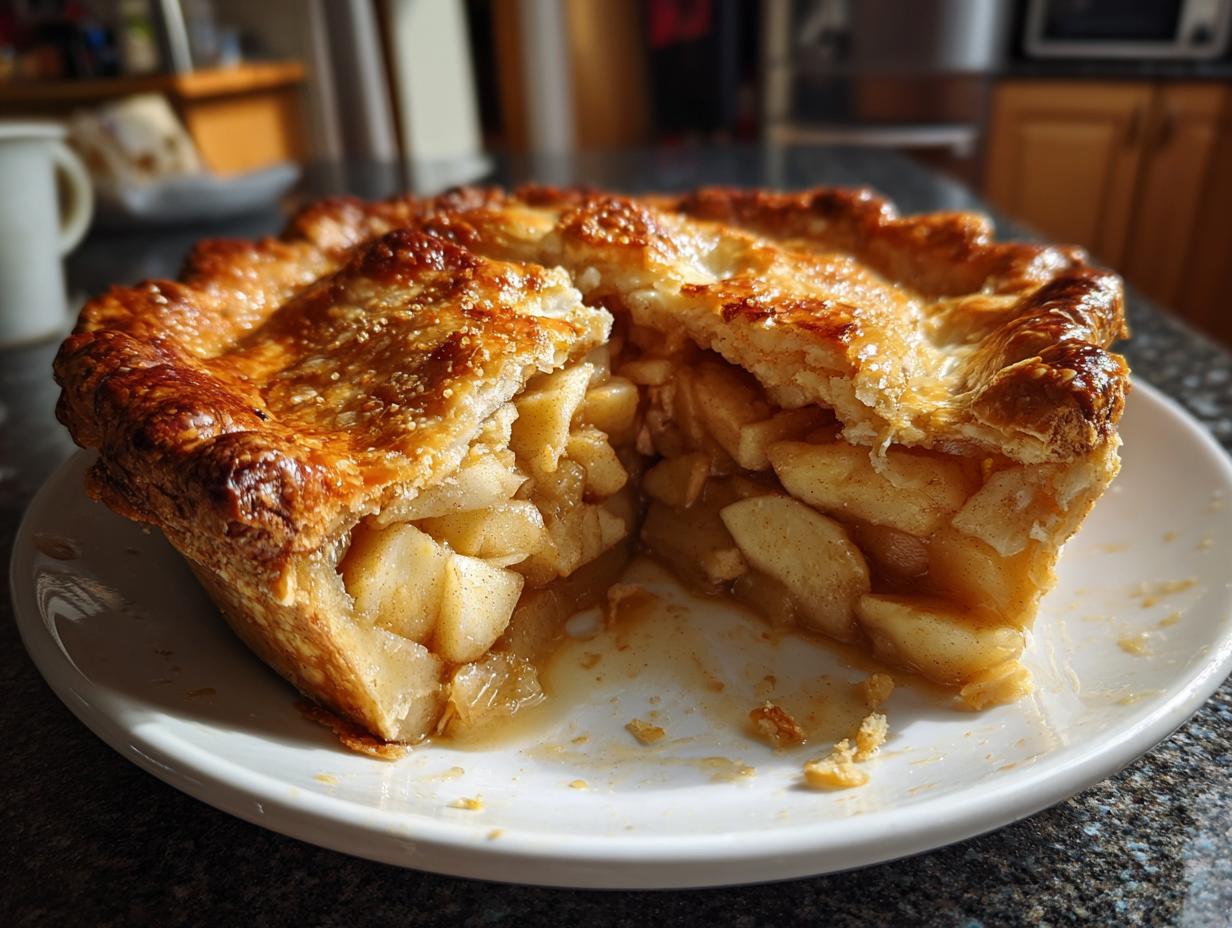
Oh, apple pie! It just screams comfort, doesn’t it? Especially a really good, Classic Apple Pie. I remember when I was little, visiting my Abuela in the countryside outside Valencia. She had this ancient apple tree in her garden, and the smell of her pie baking on a crisp autumn afternoon was just… magic. It’s one of those desserts that just makes everything feel right in the world, perfect for cozy fall evenings or making any holiday gathering feel extra special. This recipe is my version of that memory – a truly timeless taste that I’m so excited to share with you all!
Why This Classic Apple Pie Stands Out
So, what makes *this* Classic Apple Pie recipe so special? Well, it’s all about that perfect balance, trust me! We’re talking:
- A crust that’s unbelievably flaky and buttery – it practically melts in your mouth.
- A filling that’s just the right amount of sweet and spiced, with those lovely warm cinnamon notes.
- Surprisingly easy to put together, even for a first-timer!
- It’s seriously versatile. Perfect for a casual weeknight treat, a holiday centerpiece, or just because you deserve something delicious.
It’s the kind of pie that brings smiles all around. Give it a try, you won’t regret it!
Gathering Your Classic Apple Pie Ingredients
Alright, let’s get down to business and gather everything we need for what I think is the ultimate Classic Apple Pie. Don’t worry, it’s not complicated at all! Having all your ingredients prepped and ready makes the whole process so much smoother, and believe me, the results are totally worth it.
Essential Ingredients for a Perfect Classic Apple Pie
Here’s your shopping list and what you need to do with them:
- For the Crust: You’ll need one batch of my favorite double pie crust recipe. If you don’t have one ready, no worries, I’ve got you covered! Just make sure it’s chilled and ready to roll.
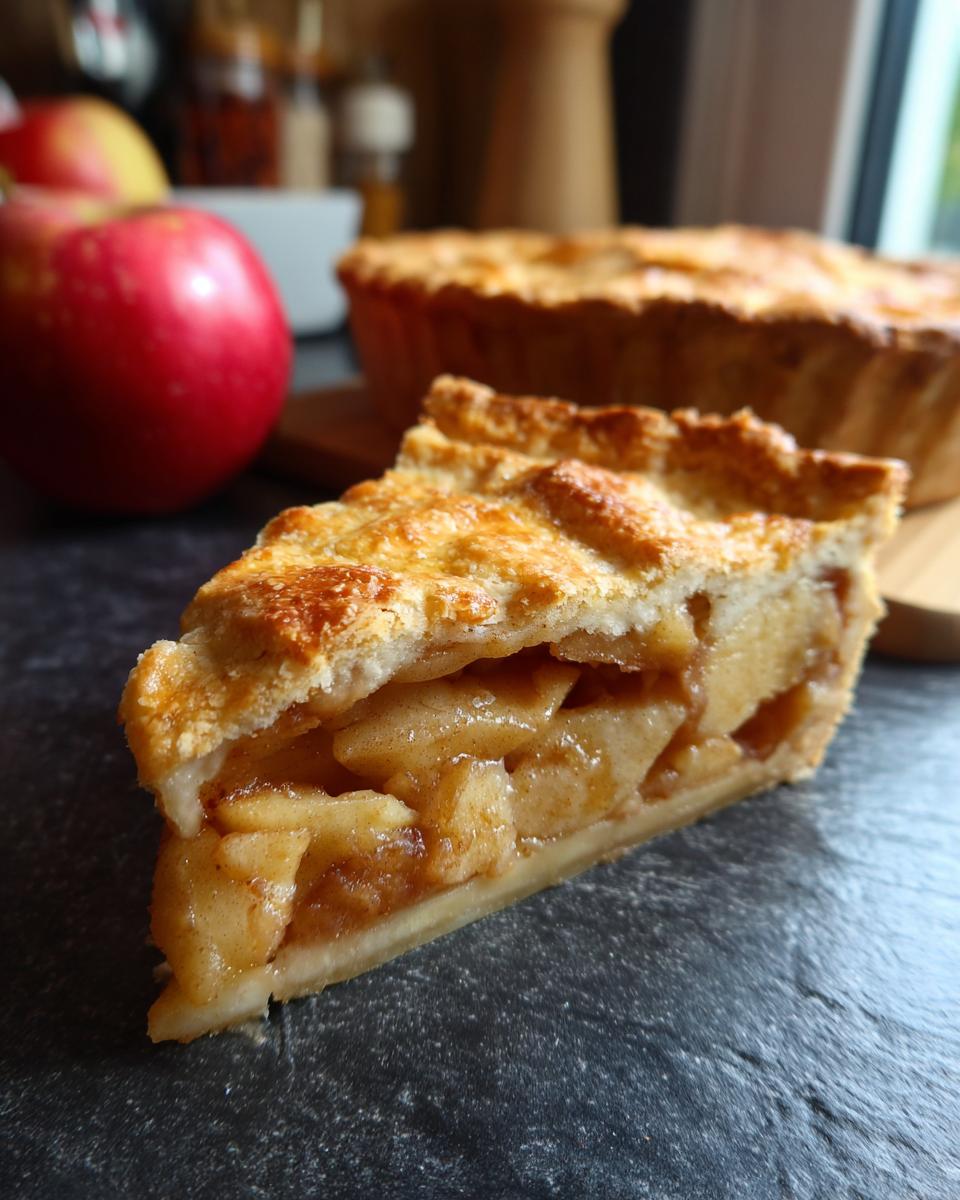
- Apples: Grab about 6 to 8 medium apples, which is roughly 2.5 pounds. I love using a mix of varieties for the best flavor and texture – think Granny Smith for tartness and maybe Honeycrisp or Fuji for sweetness. You’ll need to peel, core, and slice them; aim for slices about 1/4 inch thick.
- Sweetness: We’re using 3/4 cup of granulated sugar for the filling.
- Thickener: 2 tablespoons of all-purpose flour helps thicken up all those lovely apple juices.
- Spice it Up: 1 teaspoon of ground cinnamon is essential for that classic apple pie warmth. A little pinch of 1/4 teaspoon ground nutmeg adds another layer of cozy flavor.
- A Touch of Salt: 1/4 teaspoon of salt balances out the sweetness perfectly.
- For the Top: 2 tablespoons of unsalted butter, cut into little pieces. This adds a little richness right on top of the apples.
- Egg Wash: 1 large egg, beaten. This is for brushing on top to get that gorgeous golden sheen.
- Sparkle: 1 tablespoon of granulated sugar for sprinkling over the egg wash. It gives the crust a lovely crunch and sparkle!
Crafting Your Classic Apple Pie: Step-by-Step Instructions
Alright, get ready to make some magic happen! Putting together this Classic Apple Pie is actually pretty straightforward, and honestly, it’s the part where you really get to feel like a baker. My Abuela always said the process was as important as the ingredients, and I totally get that now. Just follow along, and we’ll have a masterpiece in no time!
Preparing the Flaky Pie Crust
First things first, let’s get that crust ready. You’ll want to lightly flour your clean countertop or a large cutting board. Take one disk of your chilled pie dough and roll it out gently into a circle about 12 inches across. Don’t worry if it’s not perfectly round, that’s part of the charm! Carefully drape this dough into your 9-inch pie plate. You can ease it into the corners without stretching it too much. Once it’s settled, trim the edges, leaving about a half-inch overhang. Then, get creative with your crimping – pinch it with your fingers, use a fork, whatever looks good to you! This is the frame for our beautiful pie.
Creating the Traditional Apple Pie Filling
Now for the star of the show – those gorgeous apples! Grab a big bowl, because we’re going to mix everything right in there. Toss your peeled, cored, and sliced apples with the 3/4 cup of granulated sugar, the all-purpose flour, cinnamon, nutmeg, and that little bit of salt. Gently mix it all up with a spoon or your hands – we want every single apple slice coated in that yummy spice mixture. Be gentle so you don’t break up the apples too much. This is what gives our Classic Apple Pie its amazing flavor!
Assembling and Baking Your Classic Apple Pie
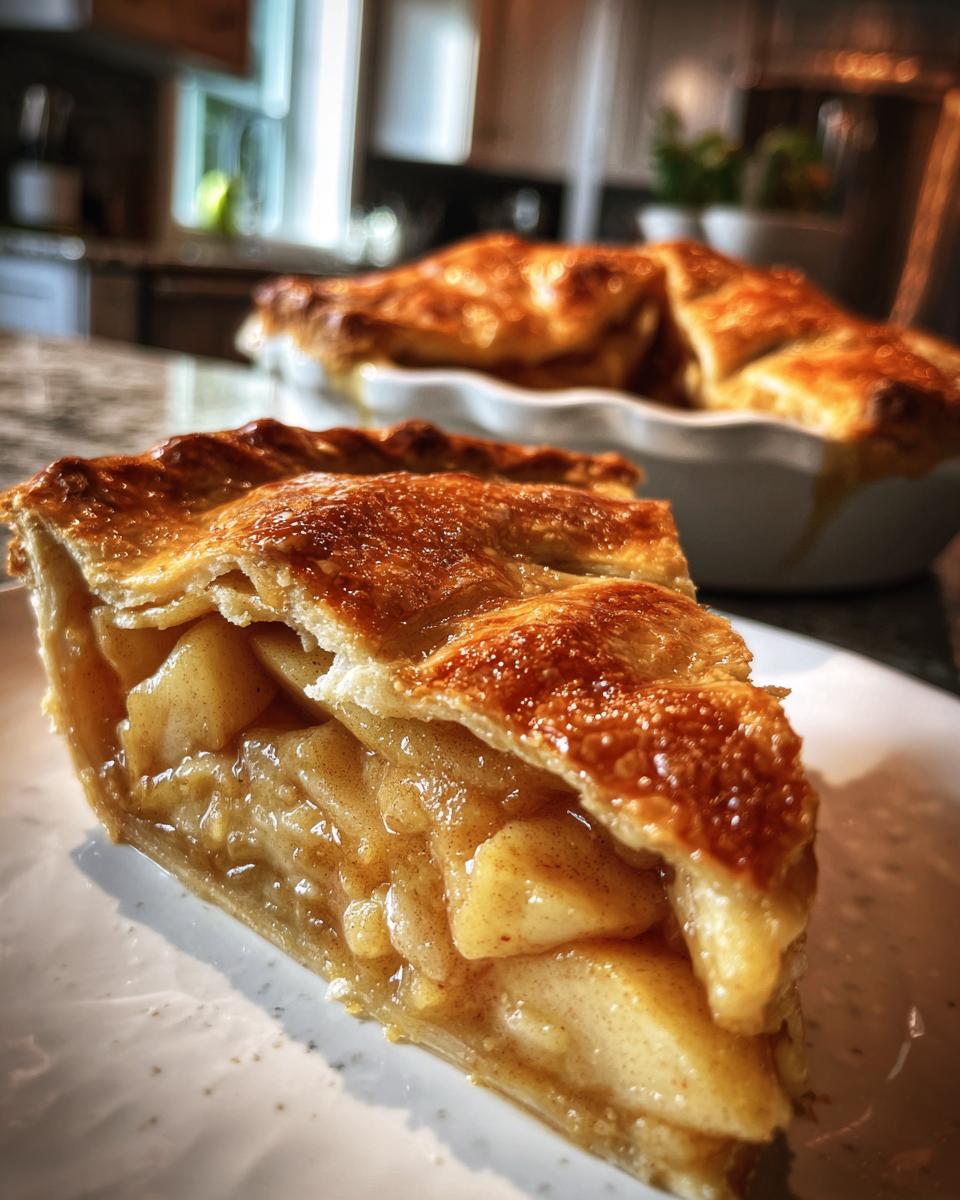
Time to bring it all together! Pour that delicious apple filling into your prepared pie crust. Try to spread it out evenly. Next, dot the top of the apples with those little pieces of butter. They’ll melt down and add such a lovely richness. Now, take your second disk of dough and roll it out just like the first one. Carefully place this top crust over the apples. Trim the edges again, leaving that half-inch overhang. Fold the edge of the top crust *under* the edge of the bottom crust, and then crimp them together all around to seal everything up. This is super important! Then, grab a knife and cut a few slits or decorative vents in the top crust. This lets the steam escape while it bakes, preventing any explosions! Brush the whole top with your beaten egg wash – this is what gives it that beautiful golden shine – and then sprinkle that extra tablespoon of sugar over the top for a little crunch.
Now, for the baking! Preheat your oven to 425°F (220°C) because we’re starting hot and fast to get that crust going. Bake it for about 15 minutes. Then, lower the oven temperature to 375°F (190°C) and keep baking for another 35 to 45 minutes. You’re looking for a crust that’s deep golden brown and you’ll see the filling bubbling up through those vents. If the edges start getting too dark before the center is done, just loosely tent the pie with some aluminum foil. The most important part now? Let it cool!
Seriously, resist the urge to slice into it right away. Let your beautiful Classic Apple Pie cool on a wire rack for at least 2 to 3 hours. This gives the filling time to set up properly, so you get those perfect, clean slices. Patience is key here!
Tips for a Truly Perfect Classic Apple Pie
Okay, so you’ve got the recipe, but sometimes a few little tricks can take your Classic Apple Pie from great to absolutely unforgettable. I’ve learned a thing or two over the years, and these little pointers really make a difference. You want that perfect slice every single time, right?
Apple Selection for Your Classic Apple Pie
Choosing the right apples is honestly half the battle! You want apples that hold their shape when baked and have a good balance of sweet and tart. My go-to mix is usually Granny Smith for a nice tart kick that cuts through the sweetness, combined with something like Honeycrisp or Fuji for that lovely natural sweetness and a bit of crispness. Avoid apples that get too mushy, like Red Delicious. A good blend means your filling won’t turn into applesauce and will have a much more interesting texture.
Achieving a Golden and Flaky Crust
Getting that perfect golden and flaky crust is all about technique and temperature. Make sure your butter and shortening (if you use it) are super cold when you make the dough – this creates steam pockets as it bakes, giving you those lovely flaky layers. When you’re assembling, try not to overwork the dough; that can make it tough. And remember that egg wash and sugar sprinkle I mentioned? That’s your secret weapon for that beautiful, slightly crisp, golden finish. Also, if you’re worried about the bottom getting soggy, you can bake the pie on the lowest oven rack, or even pre-bake the bottom crust for about 10-15 minutes before adding the filling! You can learn more about preventing a soggy bottom.
Serving and Storing Your Delicious Classic Apple Pie
Okay, the hardest part is over – your amazing Classic Apple Pie is baked and cooled! Now comes the best part: enjoying it. This pie is wonderful all on its own, but there are a few things that just make it sing even more. And if, by some miracle, you have leftovers (which I doubt!), I’ll tell you how to keep it tasting just as good.
Delicious Serving Suggestions for Classic Apple Pie
Honestly, a slice of this pie is a treat, but serving it warm with a scoop of good quality vanilla bean ice cream is pure heaven. The contrast of the warm pie and the cold ice cream is just divine. A dollop of freshly whipped cream, maybe with a tiny bit of sugar and vanilla, is also fantastic. For a real old-fashioned touch, a small pitcher of caramel sauce on the side is never a bad idea either!
Storing and Reheating Your Classic Apple Pie
If you happen to have any leftover pie (seriously, how?!), just cover it loosely with plastic wrap or foil and leave it at room temperature for up to two days. If it’s really warm where you are, or if you have more than two days’ worth, pop it in the fridge. To reheat, just pop a slice in a warm oven (around 300°F or 150°C) for about 10-15 minutes until it’s warmed through. This brings back that lovely crispness to the crust and makes the filling gooey again, just like it was fresh out of the oven!
Frequently Asked Questions About Classic Apple Pie
Got questions about making the best Classic Apple Pie? I totally get it! Baking can sometimes feel like a science experiment, but don’t worry, I’ve got you covered. Here are a few things people often ask:
Q: What are the best apples for a classic apple pie?
A: For that perfect texture and flavor in your homemade apple pie, you really want apples that hold their shape and have a good mix of sweet and tart. My favorites are Granny Smith for tartness, and Honeycrisp or Fuji for sweetness. A blend is always best for a complex taste!
Q: How do I stop my classic apple pie crust from getting soggy?
A: Ah, the dreaded soggy bottom! A few things help. Make sure your crust is chilled before you start. When you add the filling, don’t let it sit too long before baking. Also, baking on the lowest oven rack helps the bottom cook through. Some people even like to pre-bake the bottom crust for about 10 minutes before adding the filling – it’s a great trick for an extra-crispy base!
Q: Can I make the apple pie filling ahead of time?
A: Yes, you absolutely can! You can mix up the filling ingredients, minus the butter dots on top, a day in advance. Just keep it covered tightly in the fridge. When you’re ready to assemble, give it a quick stir and pour it into your pie crust. It makes the whole process much quicker on baking day!
Q: My pie crust is browning too fast! What should I do?
A: That happens sometimes, especially with a really good, buttery crust! If you see the edges getting too dark before the center is bubbly and cooked through, just loosely tent the pie with aluminum foil. This protects the crust while letting the filling finish cooking. It’s a simple fix for a beautiful pie!
Nutritional Information for Classic Apple Pie
Just a heads-up, the nutritional info for this Classic Apple Pie is an estimate, you know? It can totally change depending on the exact apples you use, how much butter ends up in your crust, and even if you add a scoop of ice cream on top! But generally, one slice (and that’s a pretty generous slice!) is around 350 calories. It’s got about 18g of fat, with 10g of that being saturated fat, and around 50g of carbs, including about 25g of sugar. It’s definitely a treat, but oh-so-worth-it!
Print
Classic Apple Pie: 1 amazing recipe
- Total Time: 2 hours 30 minutes
- Yield: 8 servings 1x
- Diet: Vegetarian
Description
A timeless recipe for a classic apple pie, featuring a flaky, buttery crust and a sweet, cinnamon-spiced apple filling.
Ingredients
- 1 recipe for pie crust (double crust)
- 6–8 medium apples (about 2.5 lbs), peeled, cored, and sliced
- 3/4 cup granulated sugar
- 2 tablespoons all-purpose flour
- 1 teaspoon ground cinnamon
- 1/4 teaspoon ground nutmeg
- 1/4 teaspoon salt
- 2 tablespoons unsalted butter, cut into small pieces
- 1 large egg, beaten (for egg wash)
- 1 tablespoon granulated sugar (for sprinkling)
Instructions
- Preheat your oven to 425°F (220°C).
- Lightly flour a clean surface and roll out one disk of pie dough into a 12-inch circle. Carefully transfer it to a 9-inch pie plate. Trim and crimp the edges as desired.
- In a large bowl, combine the sliced apples, 3/4 cup granulated sugar, flour, cinnamon, nutmeg, and salt. Toss gently to coat the apples evenly.
- Pour the apple mixture into the prepared pie crust. Dot the top of the filling with the small pieces of butter.
- Roll out the second disk of pie dough into another 12-inch circle. Place it over the apple filling. Trim the edges, leaving about a 1/2-inch overhang. Fold the top crust edge under the bottom crust edge and crimp them together to seal. Cut vents in the top crust to allow steam to escape.
- Brush the top crust with the beaten egg and sprinkle with the remaining 1 tablespoon of granulated sugar.
- Bake for 15 minutes at 425°F (220°C).
- Reduce the oven temperature to 375°F (190°C) and continue baking for another 35-45 minutes, or until the crust is golden brown and the filling is bubbly. If the crust starts to brown too quickly, you can loosely tent it with aluminum foil.
- Let the pie cool on a wire rack for at least 2-3 hours before slicing and serving. This allows the filling to set properly.
Notes
- You can use a mix of apple varieties for a more complex flavor. Granny Smith, Honeycrisp, and Fuji apples work well.
- For a richer crust, you can use half butter and half shortening.
- Serve warm with vanilla ice cream or whipped cream for a classic treat.
- Prep Time: 30 minutes
- Cook Time: 50-60 minutes
- Category: Dessert
- Method: Baking
- Cuisine: American
Nutrition
- Serving Size: 1 slice
- Calories: 350
- Sugar: 25g
- Sodium: 200mg
- Fat: 18g
- Saturated Fat: 10g
- Unsaturated Fat: 8g
- Trans Fat: 0g
- Carbohydrates: 50g
- Fiber: 4g
- Protein: 3g
- Cholesterol: 45mg
Keywords: apple pie, classic apple pie, homemade apple pie, apple pie recipe, cinnamon apple pie, fall dessert, Thanksgiving dessert, old fashioned apple pie, from scratch apple pie, baking